To kick off this series on offensive security techniques, I am going to begin with what I consider to be the most important aspects of pentesting. Passive Recon and OSINT. Now, do not let the word ‘passive’ fool you. This is no light recon; you can uncover vast amounts of information through passive recon, without ever doing anything intrusive.
Define Passive
My definition of the word “passive” is probably different to what others would define as passive. In my book, it’s anything that can be disguised as regular traffic, nothing intrusive, or easily detectable. Basically, if you can’t be distinguished between an attacker and a visitor, and you aren’t doing anything intrusive/potentially damaging, it’s passive. I know I will get a few who will argue to the death this is not 100% passive, and you’d be right, but this is still my pre-pentest workflow.
Where do I start?
Good question. This will hugely depend on what sort of pentest you’re doing. There is a spectrum of different types of pentests: Black Box Pentest, White Box Pentest, and Anything in between.
A Black Box Pentest is when you’re simulating an attacker, you’re given a single starting host, and usually a list of in-scope IP addresses, and that is all. You must attempt to discover services, network design, and things of that nature.
A White Box Pentest is similar, except you are given everything that an internal employee (and more) would have, this includes application source code, network design configurations, diagrams, stuff like that.
Both types of pentest have their place. Typically a Black Box pentest is more telling than a White Box pentest, as it shows what an external attacker could discover with very little starting information. In this series, we’re going to be covering the former, Black Box pentesting, as it is the most common sort of pentest and will be what most organizations are looking for.
Now, you’ll quickly notice that I mentioned you may be given a list of in-scope IP addresses. To simply scan all these IP’s and be done with it is very unrealistic, and so you should first begin with your asset discovery stage. Now there are a load of ways we can do this, and I am going to use Google as an example of this, and we’re going to be using the company website as our starting point. https://www.google.com/
Burp Suite Passive, as observant as Sherlock Holmes
What can we do with this? The first thing I like to do is visit the website with my browser configured to use Burpsuite as a proxy, and with a root SSL cert installed.
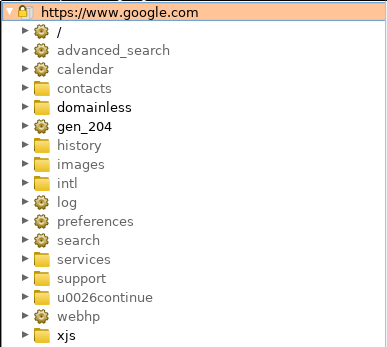
If you look on the side bar of your BurpSuite, under Target > Site map > https://www.google.com/. We can already see a quick overview of immediate file structure of the site, loaded scripts, and if we look at the wider Site map, a long list of other requested hosts, we may decide to use this information later. As always, it’s better to collect too much information and decide not to use it than to remove it and end up needing it later. Remember, this is ‘passive’ recon, we need to stay very quiet in this stage, and not set off any alarm bells. Note, if this particular website does not receive many page views, you may decide to use a VPN using the same region as the target demographic for this website. If the SOC/SIEM solution is sensitive, even a page view from a foreign location could create flags. If your goal is to not be detected by any monitoring solution (as usually is the goal with a good pentest), then this might be a thing you would go for.
If you have Burp Suite Professional, you can right click this asset and select “Passively Scan this Host,” and it will hunt your existing, requested page code for known vulnerabilities, email disclosure and the like.
Okay, so that hasn’t helped us significantly. Occasionally, things will pop out like /cgi-bin/ , /admin/ or /includes/, if something does catch your eye, immediately write this down in your reporting software (perhaps in a tool like Lair 7).
Passive port scanning with Shodan… Wait, passive port scanning? What?
You’ve been to the website, you know at least port 80 or port 443 is open, but what else is running? You can just open up Shodan, or you can use the insanely cool nmap scripts.
Obtain a Shodan API key, and place it in line with this nmap command:
nmap –script=shodan-api –script-args ‘shodan-api.apikey=XXXXXX’google.com
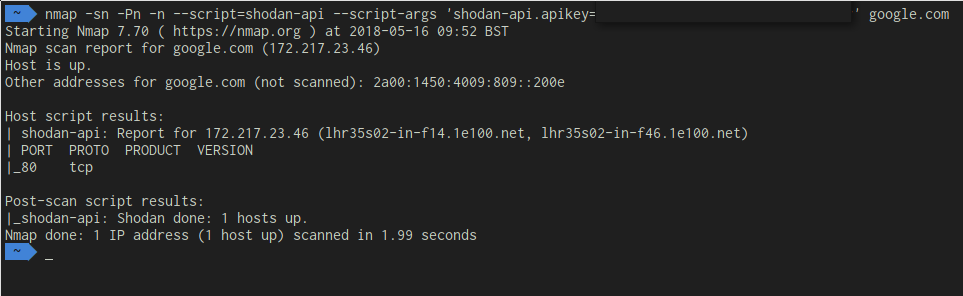
In this image, I have censored my API key, although this is a very simple example, this will do multiple things:
-sn – Disable Port Scan
-Pn – Skip host discovery, don’t ping the host,
-n – Skip DNS Resolution
Nmap will then realize it has nothing left to do and will run the shodan-api script. The Shodan API script will go out to shodan.io and retrieve all information it knows about the host, including sometimes host versions and port numbers. This has been way more information in other circumstances, your mileage may vary.
The point of these tutorials is to provide a very realistic view of what you will see in a normal pentest, and usually, you will not get a single Severity 5 vulnerability with remote code execution, you’ll find 5 Severity 3’s, and you can then string these together to get a shell, to get access to a panel, or even make a very convincing phishing page. We will cover that in more detail in the exploitation section of this series.
DNS Brute-forcing, but really fast
Before we go into DNS brute-forcing, we’ll investigate the low hanging fruit of DNS, and that is zone transfers. Zone transfers was initially a tool used for server administrators to allow them to easily replicate a DNS database, such as transferring to new domain names. If the target company has ever migrated their website, and have little security awareness, this will usually work.
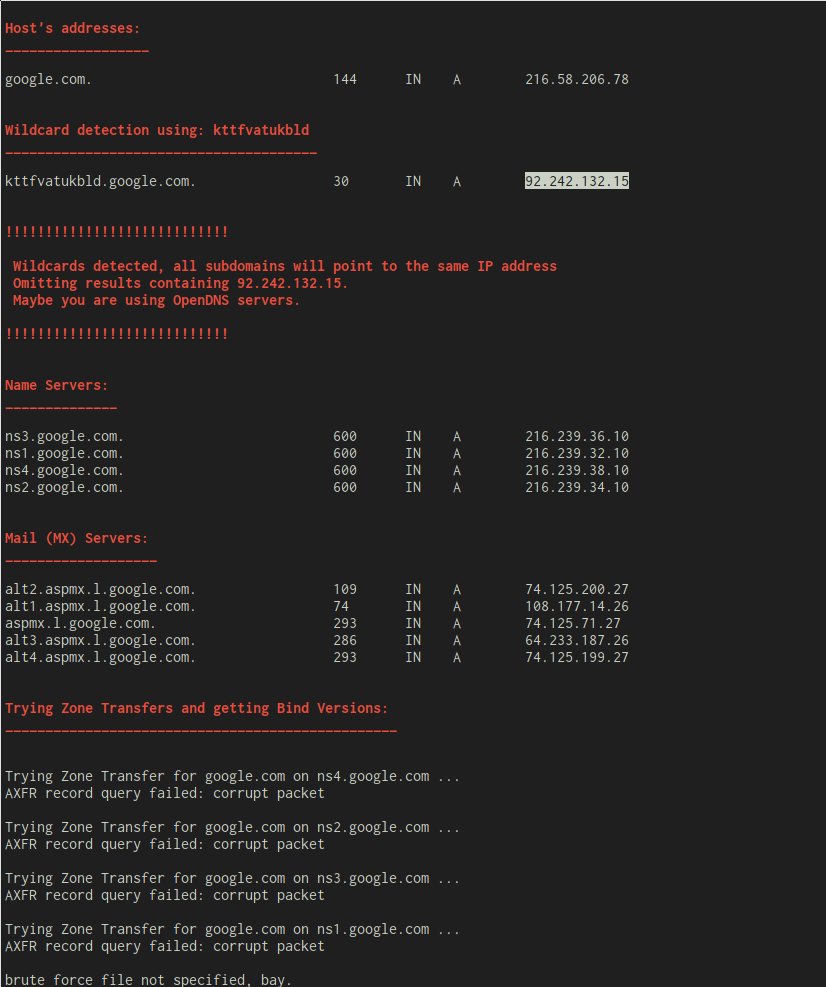
We can easily do domain transfers using a tool called dnsenum. It is written in Perl and is a reliable tool in my pentest arsenal. As you can see here, dnsenum uncovered a few interesting things about the host, namely:
Host Address: This is the IP that you’ll get when you do a simple nslookup on the domain
Wild Card Host: This is the IP that will be returned when you call a random subdomain, such as kttfvatukbld, unless you get lucky (or unlucky, your call), and that is a real sub-domain, this is usually an IP from your DNS provider, or from your ISP. If they’re secure, the wildcard domain will be the same as the Host IP, which makes domain enumeration a bitch.
Nameservers: These are the nameservers that you have used to do the lookup, usually, in a small-medium sized company, this DNS is hosted elsewhere, and can often be courtesy of the domain name registrar. This can be insanely useful information.
MX Servers: Now this information is so easily overlooked, although it is very surprising what this can yield. This will reveal the MX servers of the domain, a lot of companies in the corporate space will use externally hosted email, such as Google or Microsoft/Outlook, quite often these things link to the entire workflow of the company, which can lead you to discover things like Microsoft Lync Servers, Login panels for user email, etc.
Zone Transfers: This is quite a rare one nowadays, you won’t see this work on a lot of hosts that are in the public domain, Facebook, Twitter etc. Although on pentests, this is surprisingly common. If this succeeds, it will return a list of all registered sub-domains, which is huge. You’re better off trying it and not finding anything as opposed to never knowing.
Ok, the fast bit. Ever heard of Aiodns? Well now you have. Aiodns is a DNS resolver that does synchronous calls over an asynchronous medium. In short, that means that you can efficiently make more than one call without closing the connection after each request. This means it can be really fast.
Introducing Aiodnsbrute! Blark had the smarts to turn this into a brute-forcing tool, and it works well…
Benchmarks on small VPS hosts put around 100k DNS resolutions at 1.5-2mins. An Amazon M3 box was used to make 1 mil requests in just over 3 minutes. Your mileage may vary. It’s probably best to avoid using Google’s resolvers if you’re purely interested in speed.
1 million requests, uh, what? Feed this tool a Discovery Dictionary nabbed from SecLists(Discovery>DNS>subdomains-top1mil-110000.txt is great), and you’re on the road to discovering every damn sub-domain this domain name has.
What makes it even cooler is that PCI compliance is a standard, and part of its requirements is that every host have a signed, valid certificate. Can’t have a valid certificate on an IP, so what do firms do? They create sub-domains for everything they need SSL access to. Yep, you guessed it, that includes VPN portals, email logins, development sites (please).
Let’s see it on google.com
$ aiodnsbrute google.com
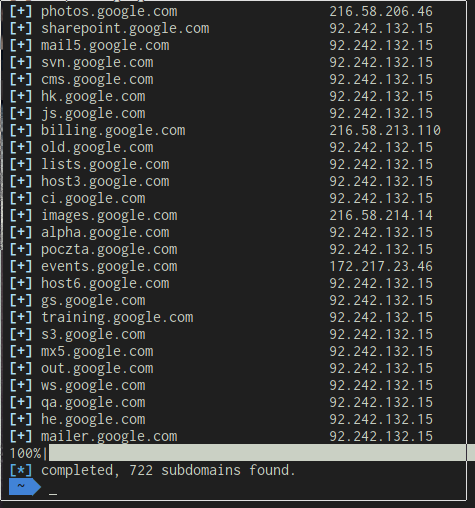
Uh, well that’s weird, why are there so many of those 92 IP addresses? Those are the DNS resolver. Remember when we did a DNS Lookup of a wildcard? Yeah, it’s the same IP. We can easily remedy this with a grep command.
aiodnsbrutegoogle.com | grep -v “the resolver IP”
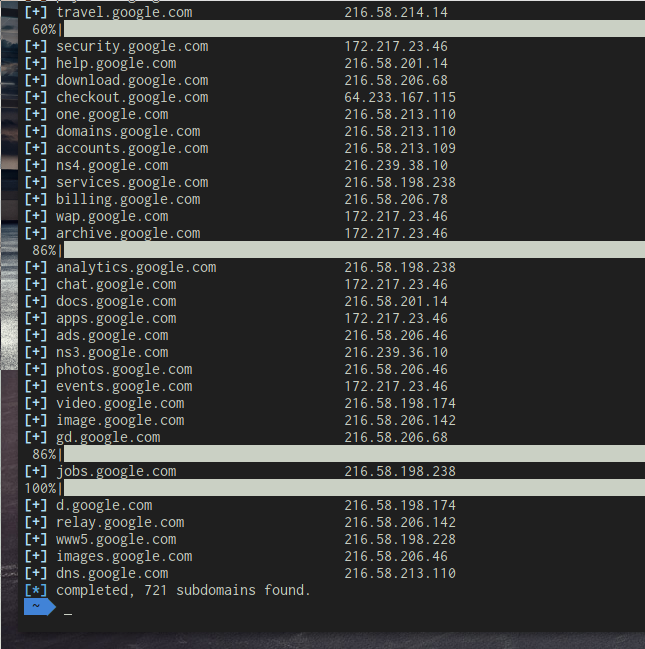
Granted, the formatting is a little broken, but this is real world pentesting people, this isn’t supposed to be glamorous! Look at those sub-domains, they go somewhere. Now you can save these IP addresses in a long text file for further examination, or maybe you want to scan them with your newly learned passive shodan skills? You can do reverse nslookups on the IP’s too and see if they resolve somewhere else.
Scraping Emails
You might have used this tool before, it’s cool. It’s called theHarvester. It scrapes google results, titles, descriptions, metadata, and looks for things resembling email addresses. ./theHarvester.py-d companydomain.com -b google

For demonstration purposes, I used protonmail.com, but put in any company domain name, and you’ll usually nab a few emails. If this doesn’t work, you can try Hunter.io, it’s like Google but for emails.
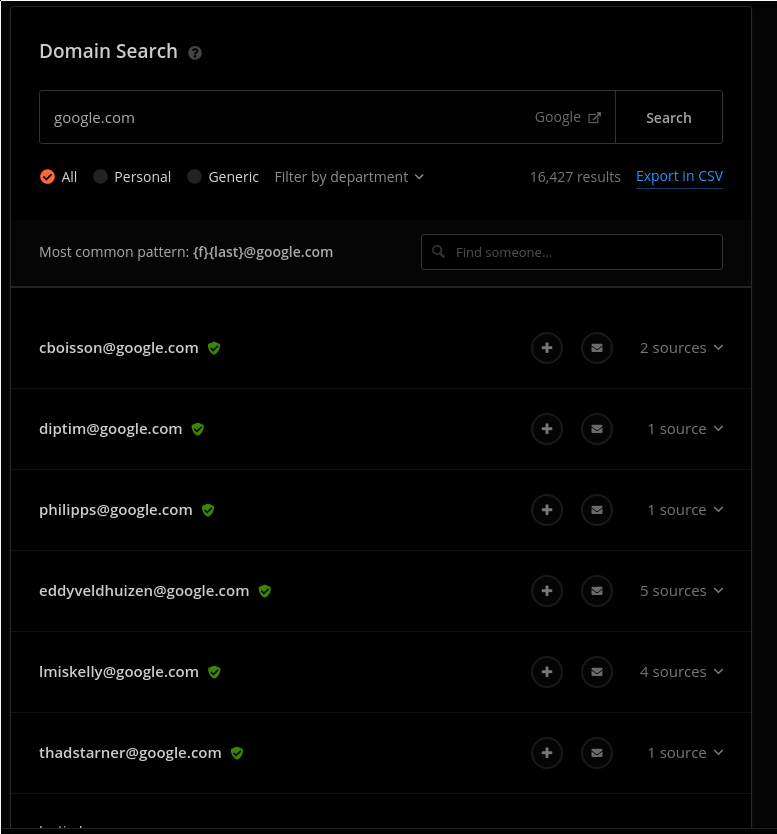
16,000 results, not bad. What this also does that is so cool is it tells you the common pattern of emails. You can use this to generate email addresses from names (I’ll go into this more in detail in part 2), which can later be used for password spraying which tries a single password for every single email address.
We can do a lot with this information, we can load it into an email program and send out phishing emails, we can password spray with them (I will show you the way), or, we can check them for leaks. This where weleakinfo comes in…
Remember those data breaches for Adobe, LinkedIn, MySpace? Well the data dumps from these breaches are still out there, and people have published them, you can still find them in old magnet links around the way, however there are thousands of dumps to recover, and they’re hard to find.
Weleakinfo takes all this information and compiles it into one big, fast, searchable database. And if you decide to stuff all these emails in there, you might even be lucky enough to get a few old passwords, which you can now variate and try on existing company accounts, how cool is this?! We haven’t even intrusively touched their servers, and we already have their account passwords? Not so fast.
16,000 emails! If an email lookup took you 10 seconds to do, and take down the results, (which is very fast) it would take you about 48 hours of non-stop copy pasting to go through them all. If you want to be able to sleep, and don’t have fingers as muscly as John Cena, then I recommend you automate it. Weleakinfo is actually nice enough to provide a public API, https://weleakinfo.com/api/public, which allows 3 requests per second, if you want to go faster, try out a tool like ProxyDock.
Geo2IP – Extra
Okay, scenario time. You know about a host’s location, but you don’t have a clue about its exact details. No problem… Time to use Geo2Ip, a tool I co-developed which basically takes a rough coordinate location, then gives you ranges associated with that coordinate. From there, you can feed these into an nslookup tool (maybe make your own with aiodns!), and discover all assets associated with them.
Reverse Whois
Another tool you can use for asset discovery is reverse whois. Now you can use these tools to enter in a company name, email address, or registrant name (obtained from your previous recon), and then go through these same steps with the newly obtained emails, domain names, and extra information. Repeat until you have no more passive information to obtain. Now you are ready for Active Recon.
In conclusion, there is a vast amount of information you can obtain just by knowing where to look. This is by no means an exhaustive list, but it contains a few of the things that I consider crucial in my day-to-day OSINT.
Feel free to post any questions or feedback in the comments section and as always, stay snappy out there.